
For business owners who rely on their Jeep Compass for daily operations, a malfunctioning backup camera can pose both safety hazards and operational challenges. This article delves into effective quick fixes that can help to diagnose and resolve backup camera issues efficiently. Each strategy is designed to equip business owners with practical knowledge, enabling them to troubleshoot problems on the spot. Chapters detailed herein cover critical checks such as assessing the reverse mechanism, verifying screen functionality, maintaining lens cleanliness, and inspecting power connections. Engaging with these actionable steps not only enhances vehicle safety but also ensures uninterrupted business operations.
Verifying the Reverse Trigger: Quick Fixes for the Compass Backup Camera Activation

External resource: For official guidance and potential service bulletin references related to backup camera activation issues, consult the following documentation: https://www.chrysler.com/service/technical-bulletins/2018-2023-jeep-compass-backup-camera-activation-issues
Verifying Display Screen Functionality for Jeep Compass Backup Camera Not Working Quick Fixes

When the backup camera on a Jeep Compass isn’t showing its feed, the path to a solution often runs through the display screen itself. The display is more than a pretty interface; it’s the central bridge between the camera, the wiring that powers it, and the vehicle’s electronic control modules. A fault in the screen can mimic a camera failure, and diagnosing this correctly means tracing the problem back to the display’s health, its responsiveness, and the way the infotainment system handles feed input. In many cases, the remedy is straightforward: reset, re-enable, or reboot the system. In others, it requires a deeper look at power and signal wiring or at a setting that has quietly shifted out of view. The key is to approach the issue as a display pathway problem first, then broaden the search if the symptoms persist. As you work through these checks, keep in mind that the camera’s image depends on a sequence: camera power and video signal, a feed into the infotainment’s input channel, and the screen’s ability to render that signal cleanly. If any link in this chain falters, the result is a black screen or a frozen image when you shift into reverse. This perspective helps keep the investigation organized and minimizes unnecessary disassembly in the bumper area or dash. A calm, methodical approach is your best ally when a dashboard screen stares back at you, unhelpful and silent in the moment you need it most.
The first consideration is the obvious but often overlooked check: does the infotainment system power on normally and display the functions you use every day? You want to confirm that the screen wakes up with the rest of the vehicle and that it shows inputs beyond the camera feed—things like the radio, Bluetooth audio, or navigation. If the display comes to life and presents these features, the issue is less likely to lie with the overall system and more likely with the camera input path or with a camera-specific setting that may have been toggled off. Conversely, if the screen remains dark or completely unresponsive even as the vehicle runs, you’ve got a stronger case that the failure lies with the display system itself, its software, or its power supply. The diagnostic logic becomes straightforward: a dead or unresponsive screen in a car that otherwise operates normally points toward the infotainment software or its hardware rather than a single camera component.
As you observe the display’s behavior, notice whether you hear any cues when you shift into reverse. A functional system typically triggers a reverse-related input that prompts the camera feed to appear. If you shift into R and nothing changes on the screen, there are two immediate possibilities: the reverse trigger mechanism is not signaling the infotainment unit, or the signal is being blocked or corrupted along the way. The reverse trigger mechanism is a small but crucial element; it sits at the intersection where the car’s gear position communicates with the infotainment system. If the switch or wiring is loose, or if a control module has encountered a software hiccup, the infotainment unit may not register the shift into reverse as a reason to display the feed. This is often the simplest explanation for a blank screen that coincides with engagement of reverse, and it directs your inspection toward connectors, harnesses, and the switch itself rather than toward the camera hardware.
To test whether the display path is intact, perform a careful audit of the screen’s responsiveness beyond the camera function. Engage the vehicle while it’s running and try interacting with the screen’s touch inputs if applicable. Does the touch respond smoothly to taps and swipes? Do you notice any lag or a frozen state when trying to access settings, radio, or navigation menus? A responsive screen that still shows a blank reverse image suggests that the problem lies in the camera input path or in a setting that governs the backup display, rather than in the display’s capability to render information. If the screen is unresponsive to touch or commands, the issue likely sits with the infotainment software or hardware, not with the camera. In such a case, a restart or a soft reset of the system can often recover normal operation without touching wires or the camera itself.
A practical next step is to restart the infotainment system, which many owners find resolves temporary software glitches. This is not about turning the car off and on from the exterior; it’s about cycling the power to the display and the infotainment module while the vehicle remains in a safe state. Turn the ignition off, wait a minute or two, and then start the vehicle again. When you return to reverse, observe whether the backup image reappears. If the feed returns after a restart, you’ve likely addressed a software hiccup rather than a hardware fault. If the issue persists, you’ll want to broaden your check to power and wiring as well as screen settings.
Another dimension to consider is the display’s settings and the infotainment menu’s backup-camera configuration. In some cases, an operator or a software update can unintentionally turn the backup feature off or switch it to a low-priority input, effectively hiding the feed when you select reverse. Carefully navigate the vehicle’s settings to confirm that the “Backup Camera” feature is enabled and that any related options—such as guide lines, camera view modes, or automatic display on reverse—are configured as you expect. If the feature has been disabled, re-enable it, save the settings, and test again. This step emphasizes a central theme: before tearing into wiring or replacing hardware, verify that software settings aren’t the culprit. The simplicity of this fix can save time and cost and often resolves what seems to be a perplexing failure.
The fuse is another potential culprit, a small, easily overlooked component with outsized impact. The backup camera usually has a dedicated fuse whose status can influence whether the system powers the camera feed. If you peruse the owner’s manual and locate the fuse box—usually in the engine compartment or under the driver’s dashboard—you’ll find a fuse related to the backup camera or infotainment power. A blown fuse will cut power to the camera, leaving the display dark or blank during reverse. Replacing a blown fuse is a simple, quick fix, but it’s important to ensure you’re replacing it with the correct amperage rating and to check for signs of a short or heat damage that may have caused the fuse to fail. If the new fuse blows again, or if you observe melted insulation or scorching on the fuse holder, this indicates a more serious electrical fault requiring professional service.
As you work through these checks, keep in mind that the path from the camera to the screen is not just a single cable but a network of connections. In some Compass models, the camera wiring may be tucked inside the rear bumper or routed along the chassis with multiple connectors. A loose, corroded, or pinched connection can disrupt the video signal even when power is present. If you find signs of wear, loose pins, or damaged insulation, you’ll want to inspect the wiring harness with the vehicle in a safe, parked state. It’s wise to approach this step with caution, as disturbing wiring can affect other electrical systems. If the camera wiring appears intact but you still face a blank display, the issue may be in the control module that orchestrates the video input, a component or software routine that requires professional diagnosis.
In these moments, the value of external guidance becomes clear. Official resources can offer confirmation of the correct steps and the proper wiring diagrams, and they can anchor you in safe, manufacturer-aligned procedures. For readers who want a consolidated reference, the Jeep support documentation offers a structured troubleshooting path for backup-camera behavior and display-related concerns. The path you take should be practical and measured—starting with the simplest software checks, proceeding to power and fuse verification, and only then moving toward wiring inspection and professional assessment if the fault remains stubbornly unresolved.
As you consider the broader picture, you can benefit from a broader community-informed overview that compiles common Compass electrical issues and practical fixes. For readers who want to explore patterns and solutions seen by others with similar vehicles, an interpretive guide compiled from a dedicated automotive site may offer useful context and cross-checks against your own findings. This resource is not a substitute for the vehicle’s official documentation, but it can help you understand where your case fits within the spectrum of typical Compass display and camera behavior. You can explore that comparative discussion here: 2014 Jeep Compass problems: common issues and fixes. The link is a compact reference that aligns with the kind of diagnostic reasoning you’re applying now, and it can illuminate how other owners have navigated similar display and camera challenges without venturing into more invasive or costly fixes. If you follow this path and the screen still refuses to illuminate the backup image, the prudent course is to seek a certified technician or an authorized service center for a more thorough diagnostic. Digital displays and camera systems are intricate, and while many faults respond to reset and reconfiguration, others—particularly those tied to control modules or camera damage—require specialized diagnostic tools and software updates that only a dealership or trained technician can provide.
In closing this segment, the logic remains straightforward: verify the display’s power, responsiveness, and settings first; then confirm that the reverse input is properly signaling the infotainment unit; next, check for fuse integrity; and finally inspect for wiring or module faults that could be the deeper cause. This sequence aligns with a practical, non-destructive approach that respects both safety and cost considerations. It honors the principle that the display is the gateway through which the camera’s feed reaches the driver, and if that gateway is compromised, the feed will be compromised too. When your Jeep Compass backup camera not working is a mystery, a disciplined, display-centered diagnosis is often the fastest, most reliable route to restoration. For readers who want to dig deeper into related Compass issues beyond the display path, keeping the focus on the screen’s health can help you stay aligned with the most effective fixes rather than chasing tangential faults.
External resource: For an official, up-to-date troubleshooting reference from the manufacturer’s support team, consult the backup camera troubleshooting guidance here: https://www.jeep.com/owners/support/faq/backup-camera-troubleshooting/.
null

null
Tracing the Power Path: Diagnosing Wires and Connectors in the Jeep Compass Backup Camera
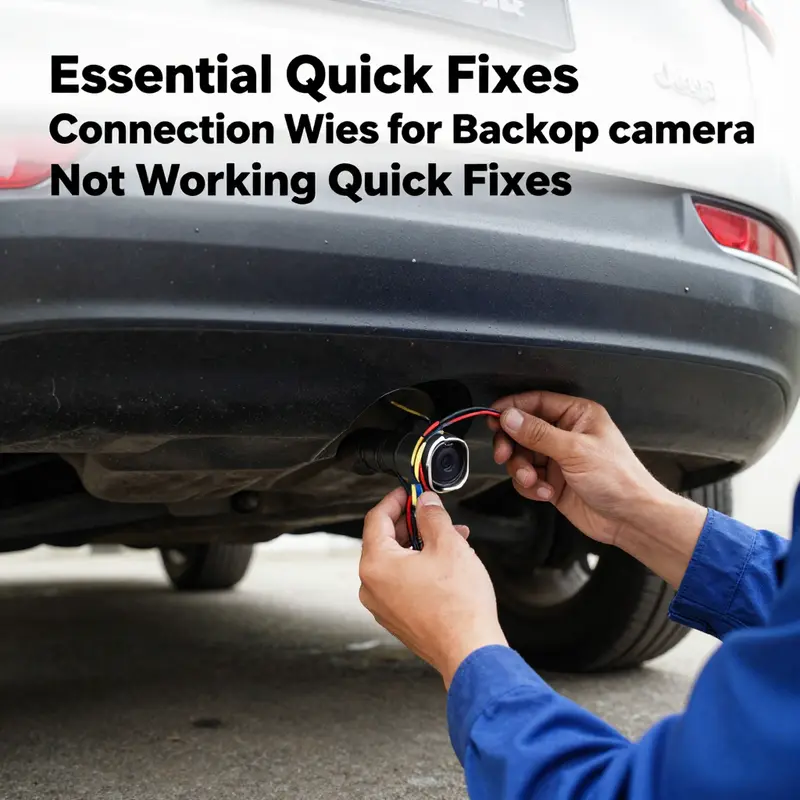
When a Jeep Compass backup camera quits, the issue often hides in plain sight along the power and signal pathways rather than in the camera head itself. The camera is a small module buried in the rear, but its job is simple: receive power, pass along a video signal, and let the infotainment screen show the scene behind you as you shift into reverse. If that chain is broken anywhere along the line—at the fuse box, inside a connector, or along a frayed harness—the image vanishes and the safety net you rely on can feel suddenly unreliable. The good news is that most power and connection problems respond to careful, methodical checks that don’t require expensive tests or specialized tools. The following narrative walks you through a cohesive diagnostic approach that centers on the two most common culprits: power delivery and the integrity of the wiring and connectors that feed the camera.
At the heart of the investigation is the power supply. The camera typically operates on a 12-volt DC circuit that is energized when you engage the vehicle in reverse. If the display on the center console remains dark when you shift into R, the first instinct should be to confirm that the camera is actually receiving power and that the signal path is intact. Start your mental map at the fuse box, because the fuse is the gatekeeper for the entire circuit. In many Jeeps, the fuse related to the backup camera is labeled as CAMERA or REAR and may be located in the engine compartment fuse block or under the driver’s side dash. A blown fuse will instantly cut power to the camera, even if the rest of the infotainment system is functioning normally. Replacing a fuse is straightforward, but the underlying cause must be considered. If the fuse repeatedly blows after you replace it, that signals a short or a fault downstream in the circuit that needs further investigation rather than a simple one-time replacement.
Beyond the fuse, the next layer to inspect is the wiring harness that carries both the power and the video signal from the vehicle’s electrical system to the camera mounted on the rear bumper. The harness is typically routed from inside the vehicle, through the rear hatch area, and into the bumper where it clips or plugs into the camera assembly. Look for the telltale signs of wear: frayed insulation, visible cuts, or abraded conductors where the cable bends as it passes through the bumper edge or where it threads through the door seal. Sharp edges can bite into the insulation and cause intermittent contact or complete open circuits. Any wire that passes through a grommet or a tight space deserves a careful close look, since vibration over time can loosen connections or nick the insulation. If you see any damage, you’ll usually need to replace the affected section of wire or the entire harness, depending on the extent of the harm.
A practical way to verify if the harness is in good shape is to inspect every connector along the path. Start at the camera end and work your way back toward the fuse box. Check for corrosion on pins, loose or bent contacts, and evidence of moisture intrusion. Corrosion can appear as a chalky white or green residue and often causes a high resistance connection that translates into a dim or flickering image, or no image at all. If you encounter corrosion, a mild wire brush can remove the surface oxide, followed by a dab of dielectric grease to seal out moisture. Dielectric grease does not conduct electricity; instead, it fills micro-crevices and protects metal contacts from water and air. Once you’ve cleaned or refreshed contacts, reconnect the harness and test again. If the image remains stubbornly absent, you’ve either got a deeper wiring fault or a camera/control unit issue that requires more targeted diagnosis.
Testing with a multimeter transforms guesswork into data. With the vehicle safely parked and the ignition off, begin by checking the voltage at the camera harness when the shift lever is in reverse. A typical and expected reading is around 12 volts DC. If you don’t see any voltage at the camera connector when you switch to reverse, trace the line back toward the fuse box while keeping an eye on the continuity of the wire. A simple continuity test can reveal breaks in the conductor that aren’t obvious to the eye. If the circuit shows an open path, the wire or a connector downstream is likely compromised. If there is power but the video signal is missing, the issue could be on the video line or in the camera itself. In some vehicles, the video signal line is more delicate than the power line; small breaks or degraded insulation can disrupt the data even if the camera is powered.
When testing power delivery, it’s important to consider the possibility that the problem is not a single damaged wire but a marginal connection that only fails under load. A loose pin or a poor crimp can hold a voltage reading when measured with a high-impedance meter, yet fail to deliver reliable current when the camera tries to draw more power while the screen is actively displaying a dynamic feed. A pragmatic approach is to perform a known-good connection test: gently reseat every connector along the path and, if possible, substitute a known-good segment of harness in a non-destructive way to see if the problem resolves. If reseating improves things but doesn’t fully restore function, you may have to replace the affected connector or harness section.
Another layer of complexity arises from the fact that some Compass models route camera wiring through the rear bumper, sometimes behind the bumper cover or inside the bumper structure itself. In these cases, accessing the wiring might require removing the bumper or dropping the trim panels at the tail. This step is not a casual DIY fix for everyone, and attempting it without a service manual or proper tooling can risk damage to the bumper or other components. If you do reach this stage, proceed with care, documenting each step, and maintain a clean work environment to prevent grit or moisture from entering the connectors. The service manual for your model year will provide the exact path and the recommended procedures for disconnecting and inspecting the wiring behind the bumper without incurring damage.
If your testing shows the harness and connectors are clean and snug, and the fuse is intact and powered, but the camera still does not deliver a picture, the fault could lie with the camera itself or with the control module that interprets the video feed. The camera module can fail due to moisture damage, impact, or age. A compromised camera may still draw current but fail to send a usable video stream. In such instances, a swap with a known-good camera (or a professional diagnostic test to verify the integrity of the camera’s image sensor and signal output) is a reasonable next step. This is where the diagnostic culture of the modern vehicle becomes clear: you are not fixing a single component in isolation but validating a chain of interdependent parts that must all work together for the back-up system to function.
From there, it helps to cross-check the system status on the vehicle’s infotainment interface. If the screen powers on and responds to other tasks—radio, Bluetooth, navigation, or apps—but does not display the backup image, the issue is more likely to be in the video signal path, possibly at the camera or a bad video connector. If, on the other hand, the screen itself is completely blank or appears to be in a fault mode, the root cause may be in the infotainment unit or a separate control module rather than in the camera harness. This nuance matters because it directs you toward different repair paths: a video signal path fault points toward wiring or camera replacement, while an infotainment fault points toward a software reset, module reinitialization, or professional service for the head unit.
As you navigate these possibilities, it is useful to keep in mind the practical guidance about reliability that the literature emphasizes. If after checking the reverse trigger mechanism, the display, and the lens you find no obvious obstruction or wiring fault, the issue could be transient or linked to a system reset sequence. Sometimes, cycling the system—powering the vehicle off, waiting a short interval, and then powering back on—can reinitialize the camera and restore the feed. You should also review the vehicle settings to ensure the backup camera feature remains enabled. In some vehicles, the feature is toggled off in the infotainment menu or impacted by a software update. These steps are not glamorous, but they often resolve fresh-start anomalies caused by software hiccups rather than hardware faults.
To place this diagnostic journey in a broader context, consider that a useful first stop for model-specific quirks is a vehicle reference that houses the common issues reported by owners and mechanics. For example, a resource focused on the 2014 Jeep Compass problems sheds light on recurring electrical concerns and wired connections that tend to surface with aging components or mileage. The chapter intentions here align with that kind of resource: to empower you to inspect with purpose, test with data, and decide when a professional hand is warranted. If you want to explore a model-specific perspective, you can consult the article about 2014 Jeep Compass problems—unveiling common issues and fixes. 2014 Jeep Compass problems—unveiling common issues and fixes. This link serves as a practical bridge between the general wiring approach described here and the vehicle-specific quirks that may appear in a Compass you own or service.
In cases where the complete path from fuse to camera has been exhausted without resolution, the diagnostic journey often circles back to the fundamental truth: the backup camera is a small, integrated system that depends on clean power, solid connections, and a functioning sensor. When any link in that chain falters, the entire system falters. The path to restoration is rarely dramatic. It is, more often, a careful audit of wiring, connections, and fuses, followed by measured replacements or cleanings and a test drive to confirm that the image reappears when you need it most. The emphasis remains on safety and reliability, not on clever tricks or shortcuts. If the steps above reveal no fault in the wiring and the camera, then the fault may lie deeper in the control electronics or the camera module itself, and professional diagnosis becomes the prudent course of action. The goal, always, is to restore a reliable rear view so you can reverse with confidence rather than guesswork.
External resource for model-year specifics and diagrams can be found here: https://www.repairpal.com
Final thoughts
In conclusion, a malfunctioning backup camera in your Jeep Compass can be a nuisance but is often easily remedied with a few simple checks. Business owners are encouraged to start with the reverse mechanism assessment, inspect the display screen, clean the camera lens, and thoroughly review power and connection wires. By following these systematic approaches, you can ensure that your vehicle remains functional and safe. Regular maintenance not only guarantees operational efficiency but also allows you to focus on your core business activities, free from the distraction of vehicle issues.